Root and Install ClockworkMod Recovery in Motorola Fire XT531/ 530
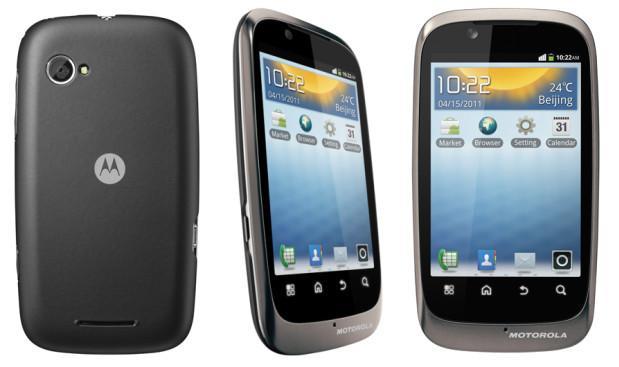
Even though Motorola have discontinued its services through whole world, but there is immense number of their users. Even the Android segment, Motorola’s Fire XT and Defy smartphone got immense success in the market. Tremendous number of users might be looking forward to root this device, since the Fire XT 531/ 530 smartphones didnt have developer’s attention.
Motorola Fire XT 531 and XT 530 are touchscreen phones. In this guide, we will tell you to root your devices, and also installing CWM recovery on the smartphone. Though you will not get lot of benefit to install ClockworkMod recovery on your smartphone, since there are hardly few custom ROMs available. For those who want to root their device and install CWM recovery, can follow through the steps provided in this tutorial.
Disclaimer: The rooting is a risky process, and it voids the warranty. Hence, you will need to unroot the device, if you will need to claim the warranty in future. This tutorial comes without any warranty or liability, though steps crafted with proper care. Neither AndroidWeblog.com nor Developer should be held responsible, if your device will be end up as damaged or bricked by performing the steps mentioned in this tutorial.
Note: This Tutorial Compatatible with Motorola Fire XT531, XT530 and XT532 Android Smartphones, and trying this on any other smartphone may surely brick your device.
Table of Contents


Pre Requisite
- Download the Latest Motorola Drivers. After downloading the drivers, also make sure that you have available Motorola Fire XT Phones compatible data cable. Before you proceed with the process, the data cable should be kept alongside since it is necessary in between the process.
- If it the first time when you have connected your Samsung Phone to computer, then it should install the drivers automatically, just you need to allow windows to Automatically Install the Drivers for your smartphone.
- Make sure to check that battery should be left minimum of 70% before starting the process, since device should not be get sudden shut down/ turn off due to power failure in between the process, since it can damage your device.
- Disable all the Antivirus and Firewall in your Computer, because they can create some unwanted conflict while process is running, so it is always a good idea to disable them until process gets finished smoothly.
- Navigate to the Settings>Developers and then check the option USB Debugging to turn on the same.
- Backup SMS, Contacts and others data for safety purpose of your valuable data.
- Make sure your Motorola Fire XT is running on Android 2.3.5 (Required). If your device have lower version, please make sure to update your device. Otherwise your device may be bricked.
If you have gone through the Pre Requisite (requirements) and now ready to go, so lets proceed with the process of step by step.
Steps to Root Motorola Fire XT 531/ XT530 Smartphones on Android 2.3.5
Step 1: First of all, you need to Download the Rooting package, which comes with SuperOneClick v2.3.3, SUTLR_v1.8.2 and patch for Motorola Fire XT device.
Step 2: Extract the .zip file downloaded in Step 1. Download Link.
Step 3: Now, just browse the folder extracted, and Install SUTLR. Please note that setup file is compatible with both of the x64 (64-bit) and x86 (32-bit) computers.
Step 4: After installation, run the SUT LR, and just click Next, then just select file FXX_PR3_NV.xml image file, which is located just inside Patch Motorola Fire XT folder, which can be found in folder extracted in Step 2.
Step 5: Make sure that your device allows installation of apps from unknown sources. You can enable the same in Settings>Applications, and also make sure that USB debugging option is marked.
Step 6: Now, it’s time to connect the Motorola Fire XT to the computer. At this step, you should not choose anything and make sure that you never select mass-storage option while connecting the device.
Step 7: After connecting the phone to computer, just flash the image file (.xml) [See Step 4] by clicking Next.
Step 8: After clicking on Next, the device will be rebooted several times, and the process would be finished shortly.
Step 9: Once, the phone is back to normal mode, you can perform a manual restart (Optional).
Step 10: Now, go to the SuperOneClick folder (See Step 2), and then run the same.
Step 11: Go forward, and click on Root button, and allow a minute or two, the process will root your device, and you’re done!
Congratulations! Your Motorola Fire XT has been rooted, and it tool hardly 5 minutes, which is awesome.
Now, next part is the guide to install ClockworkMod Recovery (CWM) in your Motorola Fire XT, follow the procedure we have compelled below.
Though, there are three methods suggested by the XDA member ‘awesomeabhijeet’, and you can check them here. But, we are here going to suggest the simplest method, which we have tried.
Please note that, your device should be rooted, and your model number should be no other than Motorola Fire XT531, XT530, and XT532.
Guide to Install ClockworkMod Recovery in Motorola Fire XT
Step 1: Download Recovery Installer_1.0.apk file. Download Link.
Step 2: Now, move the app to phone and install the same.
Step 3: Now, run the app Recovery Installer from App Menu.
Step 4: Just click on Install Recovery option and you will get CWM (ClockworkMod) Recovery installed in few moments.
Congratulations! You’ve installed Custom Recovery (CWM) on your Motorola Fire XT phone. If you’ve faced any problem during the process, please do let us know in comments, we will do our best to help you out to resolve the same.