Root Y Mobile S1/ S2 Android One Devices and Install TWRP Recovery
If you own a Y Mobile S1/ S2, and also want to root the device, then you are on the right page.
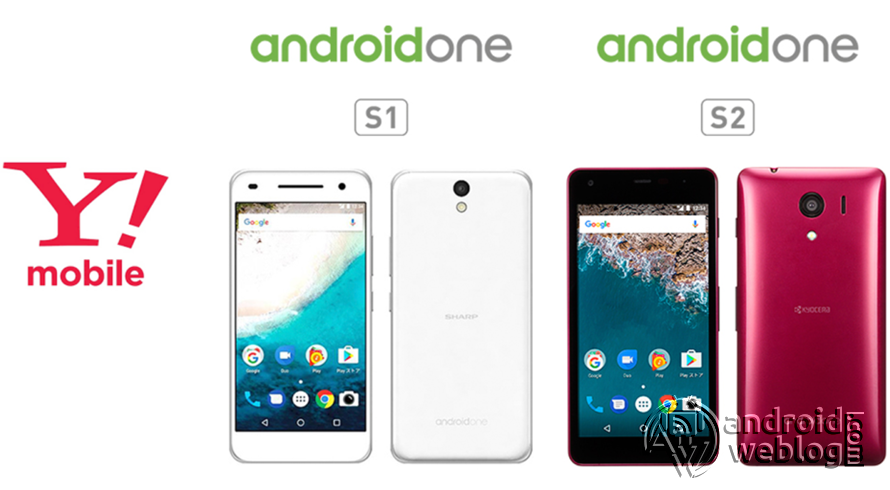
Y Mobile S1 and S2 are the 2016 Android One Devices, which is an Google‘s initiative. The major highlight of the Android One devices is that they come with at least 2 years updates guarantee, and update comes within 18 months of it’s release. As case with the Softbank Group backed Y!Mobile Sharp S1 and Kyocera S2. The display measures 5.0-inch, and features FullHD resolution of 1920×1080 pixels. The device is backed by a Snapdragon 430 Octa-core processor running at 1.4 GHz, coupled with 2GB of RAM, and 16GB of ROM. The battery has the 2530 mAh size, which delivers the quite longer backup. The smartphone features the IGZO liquid crystal power saving performance, and fully compatible with Qualcomm Quick Charge 2.0 technology. The microSD card up to 256GB is supported by the device. Though the device is IPX5/ IPX7 waterproof, as well as IP6X dustproof. The main camera on the rear is a 1.3 megapixel, as well as 8 megapixel front camera.
If you are an Android Enthusiast, and want to Root and Install TWRP recovery on your beloved, then you have landed on the right page. In the due course of the article, we will guiding you through the process to root Y Mobile S1/ S2 .
The TWRP features the material design, and attractive user interface (UI), and by following this guide you can install latest TWRP for Y Mobile S1/ S2. You can download TWRP Recovery from the links provided in the pre-requisite section of this article. Kindly note that this is a unofficial TWRP recovery and is only for Y Mobile S1/ S2 (Kindly confirm the model by going to Settings>About). The process given below is merely for rooting and installing TWRP on Y Mobile S1/ S2, do not try out this method on any other device.


If you want to unleash the full potential of the hardware of your Y Mobile S1/ S2 , then rooting and flashing custom recovery like TWRP is the main concern. The Stock ROMs have often limited and unsupported features in the sense of Customization. When you have a rooted device and also flashed TWRP recovery, then you are free to install any Custom ROMs, Mods, Kernel, and Xposed etc., as well as many apps which requires root access to work properly. You can easily root the device with One Click Android Root Tool, with either via PC or through the APK, which is a quick process.
Table of Contents
Brief Details and Advantage of TWRP Recovery
TWRP (Team Win Recovery Project) is an open source, community development project. By flashing the TWRP, your device will be enabled to install any custom firmware, rooting your smartphone, mod zip files for customizations, Xposed Modules for customized features, one click root and unroot processes. Apart from that, it allows you to take Full Nandroid Backup and restore it later, one click image file flashing, remove bloatware, overclock and underclock. Using TWRP, one can easily clean Wipe, Cache and Data after flashing any image file to reflect the changes and rectify minor errors due to cache.
For installing the TWRP, your Y Mobile S1/ S2 phone must have the Unlocked bootloader. That means you have to firstly unlock the bootloader to root your device as well doing any customization.
Prerequiste
Ensure to check your model number, which must be:
- Y Mobile S1/ S2 (Sharp S1 and Kyocera S2)
You must have to ensure that prior to rooting your phone , you have read thoroughly the disclaimer and you agree to proceed further on your risk.
- Phone Should be Charged
Your phone must be 70% charged at least, else, it may lead to complications sometimes while experimenting. Why to take risk, try to charge it fully.
- Back Up
If you are either going to root your phone or install a Custom ROM, it is a good habit to make a back up of your phone. Make a back up of all your media like images, videos and all on your PC and your contacts on Cloud.
- Enable USB Debugging
(Applicable only for PC method, Skip if you will use APK method)
You must enable USB debugging option by going in to Settings, Applications and Developer options.
Downloads For Rooting Y Mobile S1/ S2
Download Universal ADB Drivers here (If your PC have already drivers installed then skip this)
Download Minimal adb here. (Google Drive Link)
Download TWRP Recovery for Y Mobile S1/ S2 from here (Login required)
Download SuperSU by Chainfire from here.
Make sure that you have downloaded the required files (link in pre-requisite section of this article). Then, proceed to the steps.
Steps to Unlock Bootloader of Y Mobile S1/ S2 (Sharp S1 and Kyocera S2)
Note: If you have already unlocked bootloader, then skip these steps.
Step 1: First, you need to Connect your Y Mobile S1/ S2 Device to the computer, in Fastboot Mode. You can reboot your device to fastboot using the command in adb terminal:
adb devices
Once the popup appears on the screen, select ‘Allow’ and ‘Ok. Then type the below command:
fastboot devices
After running the above command, the phone will switch off, and then enter into the bootloader mode.
Step 2: Now, at the interface of Adb Terminal in PC, just enter this command:
fastboot oem unlock
You will see the device attached, then run this command
adb reboot bootloader
Step 3: The phone will ask for confirmation, use the Volume Up button to select ‘Yes’ and then, issue this command:
fastboot reboot
At this stage, your device will be reboot automatically, or do it manually once done. Now, you can Root Y Mobile S1/ S2, as bootloader of your device is already unlocked.
Steps to Flash/ Install TWRP on Y Mobile S1/ S2 (Sharp S1 and Kyocera S2)
Step 1: Assuming you have already downloaded the Minimal ADB on your PC. The platform-tools contains the required adb and fastboot binaries.
Step 2: Make sure that the drivers are installed on your computer. Then, skip to the next step.
Note: If Developer Settings and USB Debugging settings are already enabled on your device, as suggested in Prerequisite section, then simply skip the Step 3 and Step 4, and follow Step 5 directly.
Step 3: Now, enable the developer settings on your Y Mobile S1/ S2 Device. To achieve the same, just navigate to the Settings -> About and then find the ‘Build Number ‘, and then tap on ‘Build Number’ for 7 times, this will enable the developer settings on your device.
Step 4: If you have USB Debugging already, then skip this step. If you have not, then open the Developer Options and then enable USB debugging option.
Step 5: Now, open the command prompt in computer/ ADB Terminal, and simply type the command:
adb reboot bootloader
Step 6: Your device should have not entered into fastboot mode. Now copy the TWRP.img file downloaded in prerequisite section, to the same folder where adb and fastboot binaries are located. Rename the file to ‘twrp.img’ and then enter this command:
fastboot flash recovery twrp.img
and then run this command, type:
fastboot reboot
Step 7 (Important): Some devices might not replace the custom recovery automatically during the first boot. You can search Google for key combinations to enter your device into recovery mode. After running the ‘fastboot reboot’ command, press and hold the proper key combination to enter device into TWRP Mode. Once the device boots to TWRP mode, the TWRP will automatically patch the stock ROM, to prevent the chances of replacing TWRP with Stock Recovery.
After typing fastboot reboot, hold the key combo and boot to TWRP. Once TWRP is booted, TWRP will patch the stock ROM to prevent the stock ROM from replacing TWRP. If you don’t follow this step, you will have to repeat the install.
Procedure to Root Y Mobile S1/ S2/ Install SuperSU
Make sure that you have downloaded SuperSU (link in pre-requisite section of this article). Then, proceed to the steps.
Step 1: Transfer the downloaded SuperSU.zip file to the internal storage / SD card of your Y Mobile S1/ S2 smartphone.
Step 2: Now, just boot into the recovery. From the TWRP interface, you can optionally backup the Stock ROM. Though, I would recommend to backup the Stock ROM. Because if in case process gets failed, you can flash the Stock ROM.

Step 3: Tap on Install ‘, and then navigate to the file ‘SuperSU.zip’ and swipe to confirm flash (located at the bottom of the screen). The flashing process of SuperSU has been started and will take few seconds to complete.
Congratulations, now you have rooted Y Mobile S1/ S2 and also flashed the TWRP. Now, you can install Xposed Framework, and customize your smartphone as per your preference. If you wish to verify, you may download and check the Root Status through Root Checker app.
Credits: greatpapa
Source: XDA


how to back stock recovery..?