Root Sony Xperia X F5121/ F5122 and Install TWRP Recovery
If you are a owner of a Sony Xperia X smartphone, and also want to customize this rugged smartphone, then you have visited the right page.
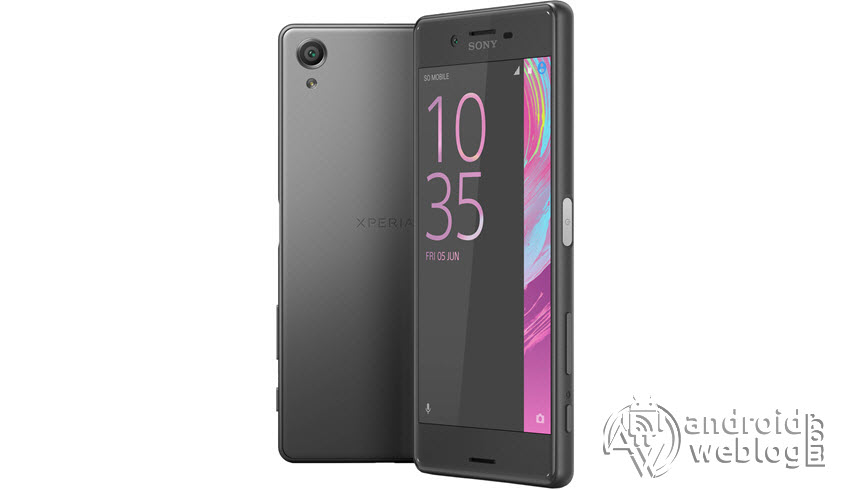
With the launch of ‘X’ Series smartphone, Sony moved the flagship series from the ‘Z’ Series to ‘X’ Series. The Sony Xperia X was launched last year, and is one of the best smartphones available in the market. Like other smartphones of Z Series, the X Series moves the next level of mobile camera. It can even predict the next move, that keeps it’s users one step ahead of others. With the launch of Xperia X flagship device, Sony worked harder to make phone’s camera faster and smoother, with quick response time with the intelligent auto focus. Sony’s proprietary technology, ‘Sony Predictive Hybrid Autofocus’ enables users to select the person or object, of course it automatically racks the same and even when the object is moving, it stays in focus, and that results as sharper details images. Sony claims that they have World’s best autofocus, and lot better than the competitors. The smartphone’s camera goes from standby mode to the ready to capture shot in merely 0.6 seconds, in blink of eye. This lightening speed Hybrid focus, along with faster image processing enables the users to capture unpredictable moments, and keep it for life. Apart from the main camera, the Sony Xperia X’s front-facing selfie camera captures the low-light selfies in the sharper details, all thanks to the 13 megapixels selfie camera. It packs a metal back, curved edges, and 12.7 cm/5.5-inch screen size. The devices is sold in Rose Gold, Graphite Black, White and Lime Gold colors, which one can choose according to their preference. Further, the ‘Sony Smart Battery Management’ makes the phone to provide up to 2 days of battery life. The Qualcomm Snapdragon 650 64-bit Hexa-core processor, along with 3GB of RAM.
If you are an Android Enthusiast, and want to Root and Install TWRP recovery on your beloved, then you have landed on the right page. In the due course of the article, we will guiding you through the process to install TWRP and root Sony Xperia X.
The TWRP features the material design, and attractive user interface (UI), and by following this guide you can install latest TWRP for Sony Xperia X. You can download TWRP Recovery from the links provided in the pre-requisite section of this article. Kindly note that this is a official TWRP recovery and is only for Sony Xperia X (Kindly confirm the model by going to Settings>About). The process given below is merely for rooting and installing TWRP on Sony Xperia X, do not try out this method on any other device.


If you want to unleash the full potential of the hardware of your Sony Xperia X, then rooting and flashing the TWRP is the main concern. The Stock ROMs have often limited and unsupported features in the sense of Customization. When you have a rooted device and also flashed TWRP recovery, then you are free to install any Custom ROMs, Mods, Kernel, and Xposed etc., as well as many apps which requires root access to work properly.
Table of Contents
Brief Details and Advantage of TWRP Recovery
TWRP (Team Win Recovery Project) is an open source, community development project. By flashing the TWRP, your device will be enabled to install any custom firmware, rooting your smartphone, mod zip files for customizations, Xposed Modules for customized features, one click root and unroot processes. Apart from that, it allows you to take Full Nandroid Backup and restore it later, one click image file flashing, remove bloatware, overclock and underclock. Using TWRP, one can easily clean Wipe, Cache and Data after flashing any image file to reflect the changes and rectify minor errors due to cache.
For installing the TWRP, your Sony Xperia X phone must have the Unlocked bootloader. That means you have to firstly unlock the bootloader to root your device as well doing any customization.
Disclaimer: The AndroidWeblog.com covers although everything in a very neat and a processed manner so that our readers get exactly what they want, still there are meager chances of basic issues that may arise out of the listed steps here. Hence it is in sole interest of the user to follow the steps very cautiously so as to stay away from any mishappenings with your device.
Rooting and flashing the Custom ROM firmware, certainly without any doubt voids your devices warranty and AndroidWeblog.com in no way will be held responsible for warranty void or your bricked device.
Prerequiste
Ensure to check your model number, which must be:
- Sony Xperia X F5321
You must have to ensure that prior to rooting your phone , you have read thoroughly the disclaimer and you agree to proceed further on your risk.
- Phone Should be Charged
Your phone must be 70% charged atleast else, it may lead to complications sometimes while experimenting. Why to take risk, try to charge it fully.
- Back Up
If you are either going to root your phone or install a Custom ROM, it is a good habit to make a back up of your phone. Make a back up of all your media like images, videos and all on your PC and your contacts on Cloud.
- Enable USB Debugging
You must enable USB debugging option by going in to Settings, Applications and Developer options.
- Unlock Bootloader
Be aware that below guide will guide you through the process of unlocking bootloader of the Sony Xperia X device. It’s undeniable fact that the same will void warranty of the device, break DRM, loss X-Reality, and will even break image optimization while clicking the low-light pictures.
Downloads For Rooting Sony Xperia X
Download Sony Drivers here (If your PC have already drivers installed then skip this)
or
Download Universal ADB Drivers here (If your PC have already drivers installed then skip this)
Download platform-tools/ SDK Tools package from Android SDK on PC from here. (Android command line tools> SDK Tools package)
Download TWRP Recovery for Sony Xperia X from here:
TWRP Recovery (AndroidFileHost.com Link)
Download SuperSU by Chainfire from here.
Custom TWRP Recovery Features
- MTP support
- ADB Sideload
- Backups and restores almost every partition
- Full SELinux support
- Working decryption. You can access /data within recovery
Steps to Flash/ Install TWRP on Sony Xperia X
Step 1: Assuming you have already downloaded the platform-tools from Android SDK (SDK Manager) platform-tools on your PC. The platform-tools contains the required adb and fastboot binaries.
Step 2: Make sure that the drivers are installed on your computer. Then, skip to the next step.
Note: If Developer Settings and USB Debugging settings are already enabled on your device, as suggested in Prerequisite section, then simply skip the Step 3 and Step 4, and follow Step 5 directly.
Step 3: Now, enable the developer settings on your Sony Xperia X Device. To achieve the same, just navigate to the Settings -> About and then find the ‘Build Number ‘, and then tap on ‘Build Number’ for 7 times, this will enable the developer settings on your device.
Step 4: If you have USB Debugging already, then skip this step. If you have not, then open the Developer Options and then enable USB debugging option.
Step 5: Now, open the command prompt in computer/ ADB Terminal, and simply type the command:
adb reboot bootloader
Step 6: Your device should have not entered into fastboot mode. Now copy the TWRP.img file downloaded in prerequisite section, to the same folder where adb and fastboot binaries are located. Rename the file to ‘twrp.img’ and then enter this command:
fastboot flash recovery twrp.img
and then run this command, type:
fastboot reboot
Step 7 (Important): Some devices might not replace the custom recovery automatically during the first boot. You can search Google for key combinations to enter your device into recovery mode. After running the ‘fastboot reboot’ command, press and hold the proper key combination to enter device into TWRP Mode. Once the device boots to TWRP mode, the TWRP will automatically patch the stock ROM, to prevent the chances of replacing TWRP with Stock Recovery.
After typing fastboot reboot, hold the key combo and boot to TWRP. Once TWRP is booted, TWRP will patch the stock ROM to prevent the stock ROM from replacing TWRP. If you don’t follow this step, you will have to repeat the install.
Procedure to Root Sony Xperia X/ Install SuperSU
Make sure that you have downloaded SuperSU (link in pre-requisite section of this article). Then, proceed to the steps.
Step 1: Transfer the downloaded SuperSU.zip file to the internal storage / SD card of your Sony Xperia X smartphone.
Step 2: Now, just boot into the recovery. From the TWRP interface, you can optionally backup the Stock ROM. Though, I would recommend to backup the Stock ROM. Because if in case process gets failed, you can flash the Stock ROM.

Step 3: Tap on Install ‘, and then navigate to the file ‘SuperSU.zip’ and swipe to confirm flash (located at the bottom of the screen). The flashing process of SuperSU has been started and will take few seconds to complete.
Congratulations, now you have rooted Sony Xperia X and also flashed the TWRP. Now, you can install Xposed Framework, and customize your smartphone as per your preference. If you wish to verify, you may download and check the Root Status through Root Checker app.
Credits: eagleeyetom
Source: XDA


Yes, all well said what is the Key combination to enter the “Recovery Mode”? seems Volume Up or down plus Power button don’t work. If you have done the above steps they do not work, unless you change the image to boot.img please make sure you have REALLY done the process, writing that one must Google for the right combination is a joke, since you have specified the model of the Sony you are writing about top of the page.